Give employees access to one private Kubernetes application without exposing it to the public internet. Start with a fresh cluster and fresh gateway identity; reuse your existing Tunnex control plane (CP), organization and licence.
What you will build
Section titled “What you will build”Existing Tunnex CP ── identity, configuration and access policy │Employee's Tunnex client ── encrypted tunnel ── Kubernetes gateway │ private Service VIP + DNS │ Nginx application podsThe CP coordinates access; application packets do not normally pass through the CP. The gateway programs the selected service path. Tunnex’s exposed-service VIP and FQDN remain the employee-facing destinations when backend pod IPs change.
This tutorial first uses one gateway and one private application. Add a second gateway only after that path works. A separate entry gateway, an NLB, Route 53 hosted zone and Route 53 Resolver inbound endpoint are not required for this tutorial’s Tunnex-managed Kubernetes names. Existing corporate DNS zones are a different integration; see Private DNS architecture.
About the live screenshots
Section titled “About the live screenshots”These screenshots were captured on 6 September 2026 from the live Tunnex AWS engineering sandbox, not a mockup. They illustrate the CP steps, not a second fresh installation. Forms labelled unsaved were cancelled; no resources or grants were created for this capture. AWS and CLI steps remain copyable commands.
The existing sandbox uses s205-aws-eks, gateways tunnex-s205-a3/b2, and
s205-private-nginx on TCP 8080. This fresh tutorial uses engineering,
engineering-k8s-a/b, and finance-nginx on TCP 80. Use your own assigned
values, not the image’s addresses or versions. The sandbox’s extra entry gateway
is not a basic-install prerequisite.
1. Prepare the existing CP and installation workstation
Section titled “1. Prepare the existing CP and installation workstation”- Sign in to your existing CP. Do not run the CP installer again or reset its database.
- Select the organization you intend to use. Confirm the account has gateway enrollment, Kubernetes management and access-policy permissions.
- For group-based service grants and HA, confirm the required Enterprise/Scale entitlement in Settings → Licence & plan. A licence does not enable HA or policy enforcement automatically.
- In Sites, create a dedicated site, such as
Engineering Kubernetes, or deliberately select an existing site. Record its name. - Install the compatible Tunnex CLI on a supported administrative workstation. For a Linux-only preview bundle, use a Linux administration host with browser device-code login. The employee can still use a supported desktop client.
- Install AWS CLI,
eksctl,kubectl, Helm 3.14 or newer andcurlon the administration workstation. Authenticate AWS using your organization’s normal SSO/profile workflow; do not put access keys in this tutorial’s files.
aws sts get-caller-identitytunnex versiontunnex k8s --helpkubectl version --clienthelm version --shorttunnex login --server https://vpn.example.comReplace https://vpn.example.com with your existing CP URL. On a headless
administration host, add --device to the login command.
Checkpoint: the AWS account and Tunnex organization are the intended ones;
the CLI exposes plan, install, status and diagnostics. Your CP’s trusted
HTTPS API and configured agent-mTLS listener must be reachable from the new
workers. Do not disable certificate verification to make enrollment succeed.
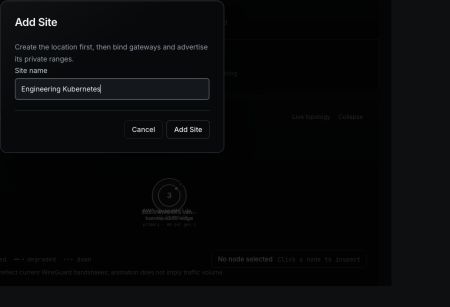
Step 1 — Unsaved example. Create your site, then verify it appears in Sites; opening this dialog alone does not create it.
2. Create a fresh AWS Kubernetes environment
Section titled “2. Create a fresh AWS Kubernetes environment”Use a new cluster name, VPC and worker group; do not reuse the development walk’s cluster, PVCs, gateway names or credentials. The example below is a small evaluation layout, not a production availability or sizing recommendation.
Before provisioning, check the region’s EC2 vCPU quota, allowed instance types and budget. EKS, worker instances, disks, public IPv4, traffic and any NAT/load balancers incur charges; free-tier eligibility is not a free-cost guarantee. Keep the existing CP out of the new cluster’s cleanup scope.
Save the following as engineering-eks.yaml. Replace ADMIN_PUBLIC_IP/32 with
the administrator’s real public egress CIDR and verify that c7i-flex.large is
available and permitted in your account. Select an EKS version supported by
your Tunnex bundle; version selection is intentionally not pinned to an old
example here. Review the generated configuration before creation.
apiVersion: eksctl.io/v1alpha5kind: ClusterConfigmetadata: name: engineering-tunnex-lab region: ap-south-1iam: withOIDC: truevpc: clusterEndpoints: publicAccess: true privateAccess: true publicAccessCIDRs: ['ADMIN_PUBLIC_IP/32'] nat: gateway: DisablemanagedNodeGroups: - name: engineering-workers instanceType: c7i-flex.large desiredCapacity: 2 minSize: 2 maxSize: 2 privateNetworking: false volumeSize: 30 volumeType: gp3 labels: tunnex.io/lab: engineeringeksctl create cluster --config-file engineering-eks.yaml --dry-run# Review the target, Kubernetes version, IAM and network plan before this write:eksctl create cluster --config-file engineering-eks.yamlaws eks update-kubeconfig --region ap-south-1 --name engineering-tunnex-labkubectl config current-contextkubectl get nodes -o wideThis lab puts EC2 workers in public subnets to avoid a NAT gateway and uses NodePort later. It does not make the application a public Service. Restrict security groups, do not open SSH or the whole NodePort range, and do not use this layout as your production network template. Public node addresses can change on replacement; production needs a separately validated stable endpoint design.
For private production workers, budget approved outbound connectivity to the CP and registry and use your platform team’s infrastructure template. Fargate, EKS Auto Mode and restricted/serverless node environments are not the verified host-network/privileged-manager path described here.
AWS references: cluster creation and API endpoint restrictions.
Enable persistent gateway storage
Section titled “Enable persistent gateway storage”The gateway’s disk holds its identity, key and fencing state. An emptyDir is not a replacement. Install the Amazon EBS CSI add-on with its IAM permissions using AWS’s EBS CSI setup. Complete both the IAM-role and add-on steps; installing the driver alone is not enough.
For standard EC2-backed EKS, save tunnex-storage.yaml:
apiVersion: storage.k8s.io/v1kind: StorageClassmetadata: name: tunnex-gp3provisioner: ebs.csi.aws.comparameters: type: gp3 encrypted: 'true'volumeBindingMode: WaitForFirstConsumerreclaimPolicy: RetainallowVolumeExpansion: truekubectl apply -f tunnex-storage.yamlkubectl get storageclass tunnex-gp3kubectl -n kube-system get pods -l app=ebs-csi-controllerCheckpoint: both Linux workers are Ready, the CSI controller is healthy and
the named StorageClass exists. WaitForFirstConsumer may leave a claim Pending
until a pod is scheduled; inspect events before calling that a failure. EBS is
zonal: a retained volume constrains future scheduling. Retain also means an
eventual PVC deletion can leave a separately billed disk.
3. Choose the gateway’s reachable endpoint
Section titled “3. Choose the gateway’s reachable endpoint”From kubectl get nodes -o wide, choose one worker and record its Kubernetes
hostname label and reachable public IP. Inspect labels with:
kubectl get nodes -L kubernetes.io/hostnameUse UDP NodePort 31081 for gateway A. In the exact security group attached
to that worker, allow inbound UDP 31081 from your test employee’s public
egress CIDR. If you later add another gateway or entry site, permit its required
peer source as well. Keep the existing cluster-internal communication rules.
Do not expose application port 80, gateway health endpoints or every NodePort
to the internet. Ensure NACLs and workstation/firewall policy allow the UDP path.
The selected node must actually host this gateway because the Service uses local traffic handling. Save these non-secret shell variables, replacing every placeholder with your values:
ORG='YOUR_TUNNEX_ORGANIZATION_ID_OR_SLUG'CONTEXT='YOUR_EXACT_KUBECTL_CONTEXT'GATEWAY_HOSTNAME='YOUR_SELECTED_NODE_HOSTNAME_LABEL'GATEWAY_ENDPOINT='YOUR_SELECTED_NODE_PUBLIC_IP:31081'CHART_VERSION='YOUR_COMPATIBLE_PUBLISHED_OR_PREVIEW_CHART_VERSION'For a private preview bundle, use the chart paths/OCI references and node image
digest supplied in its manifest, adding --chart, --host-posture-chart and
--image to both commands below. Authenticate the registry outside the
command; workers also need pull permission. A workstation registry login does
not give Kubernetes permission to pull images. Never paste registry passwords
or a gateway join token into Helm values, Git or command arguments.
4. Plan and install gateway A
Section titled “4. Plan and install gateway A”tunnex k8s plan \ --org "$ORG" --context "$CONTEXT" \ --node-name engineering-k8s-a --release engineering-a --namespace tunnex \ --chart-version "$CHART_VERSION" \ --host-posture-chart-version "$CHART_VERSION" \ --storage-class tunnex-gp3 \ --service-type NodePort --node-port 31081 --endpoint "$GATEWAY_ENDPOINT" \ --gateway-node-selector "kubernetes.io/hostname=$GATEWAY_HOSTNAME"
tunnex k8s install \ --org "$ORG" --context "$CONTEXT" \ --node-name engineering-k8s-a --release engineering-a --namespace tunnex \ --chart-version "$CHART_VERSION" \ --host-posture-chart-version "$CHART_VERSION" \ --storage-class tunnex-gp3 \ --service-type NodePort --node-port 31081 --endpoint "$GATEWAY_ENDPOINT" \ --gateway-node-selector "kubernetes.io/hostname=$GATEWAY_HOSTNAME" \ --yesRead the redacted plan before approving it. The CLI installs/reuses the shared
tunnex-host-posture release in tunnex-system, enrolls a unique gateway using a
short-lived Secret, waits for real readiness and removes consumed bootstrap
metadata. The host manager requires privileged admission; the gateway uses host
networking and specific network capabilities. Do not bypass an admission refusal
with manual sysctl, CNI, Secret or PVC patches.
tunnex k8s status --context "$CONTEXT" --release engineering-a --namespace tunnextunnex k8s diagnostics --context "$CONTEXT" --release engineering-a --namespace tunnexkubectl -n tunnex get deployments,pods,services,pvckubectl -n tunnex-system get daemonset tunnex-host-postureCheckpoint: the gateway is Ready and Online in the CP, its endpoint is the chosen public address and port, and its PVC is Bound. Record its gateway ID and PVC UID, not its private key. In the CP, assign/bind this gateway to the site from step 1 before registering the cluster. Do not move a shared production gateway between sites for the tutorial.
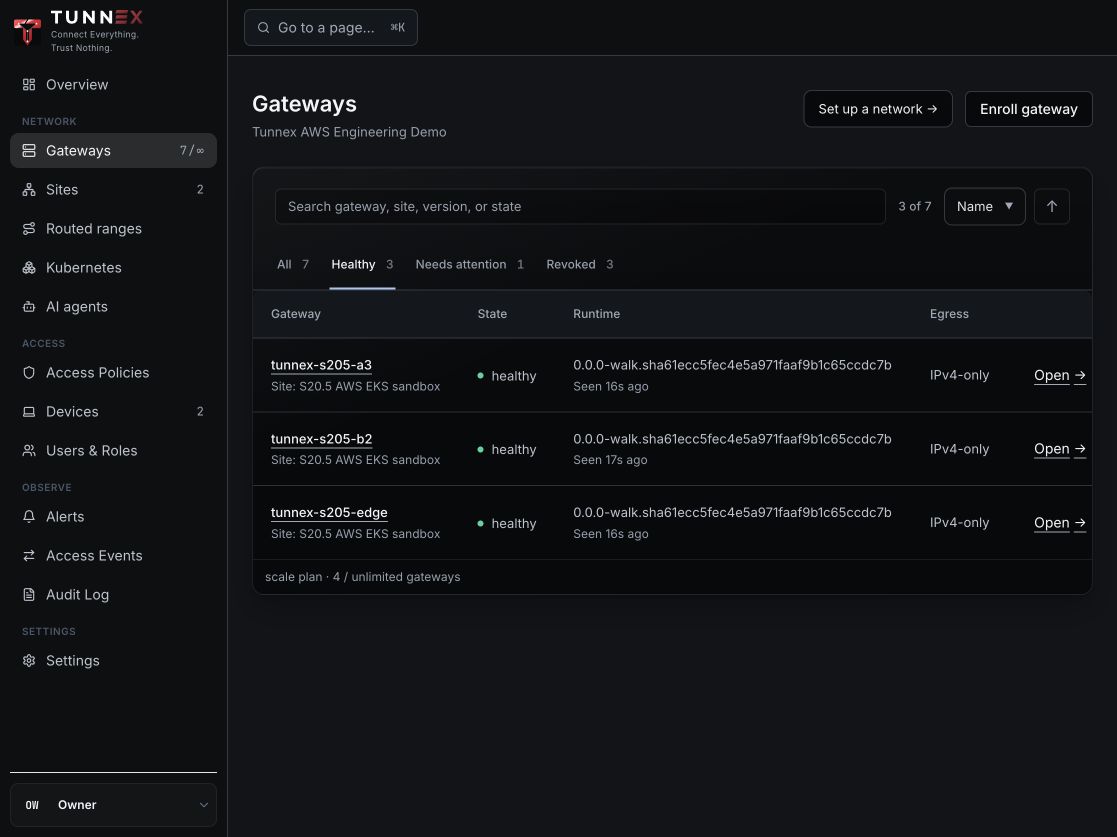
Step 4 — Existing healthy gateways. Your first installation needs only one. The displayed runtime version is enrollment metadata, not proof of the running image digest; verify readiness and installed versions with the commands above.
5. Register the cluster in Tunnex
Section titled “5. Register the cluster in Tunnex”Open Kubernetes → Register cluster in your existing CP:
-
Choose AWS → EKS, the
Engineering Kubernetessite, and gatewayengineering-k8s-aas the in-cluster connector. -
Name the Tunnex cluster
engineering. This is its Tunnex name, not an AWS import. -
Read the real Kubernetes Service CIDR:
Terminal window aws eks describe-cluster --region ap-south-1 --name engineering-tunnex-lab \--query 'cluster.kubernetesNetworkConfig.serviceIpv4Cidr' --output text -
Enter that value under advanced networking. Choose an unused synthetic VIP range, for example
100.96.20.0/24, only after checking for overlap with office, client, VPN, pod, Service and VPC ranges. -
Choose a dedicated private DNS suffix, for example
engineering.internal.example.com, under a domain your organization controls. Do not reuse a suffix already owned by another resolver integration. -
Enroll and check that a connector is selected, not Connector required.
Registration is metadata and connector configuration; it does not provision AWS resources or grant every employee access.
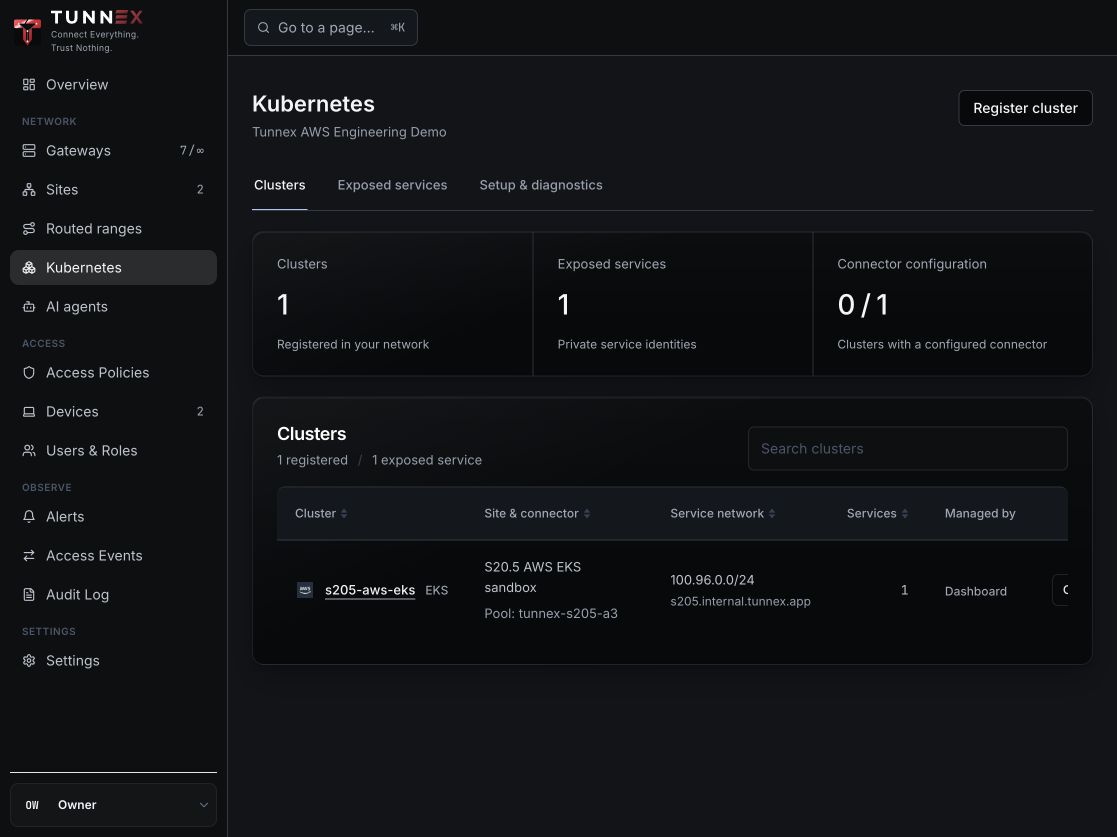
Step 5 — Existing sandbox cluster. This preview’s summary says connector
configuration 0 / 1 despite the configured pool shown on the card: the summary
counter does not account for pool-backed connectors. Check the actual pool and
gateway state; do not interpret that counter as installation proof.
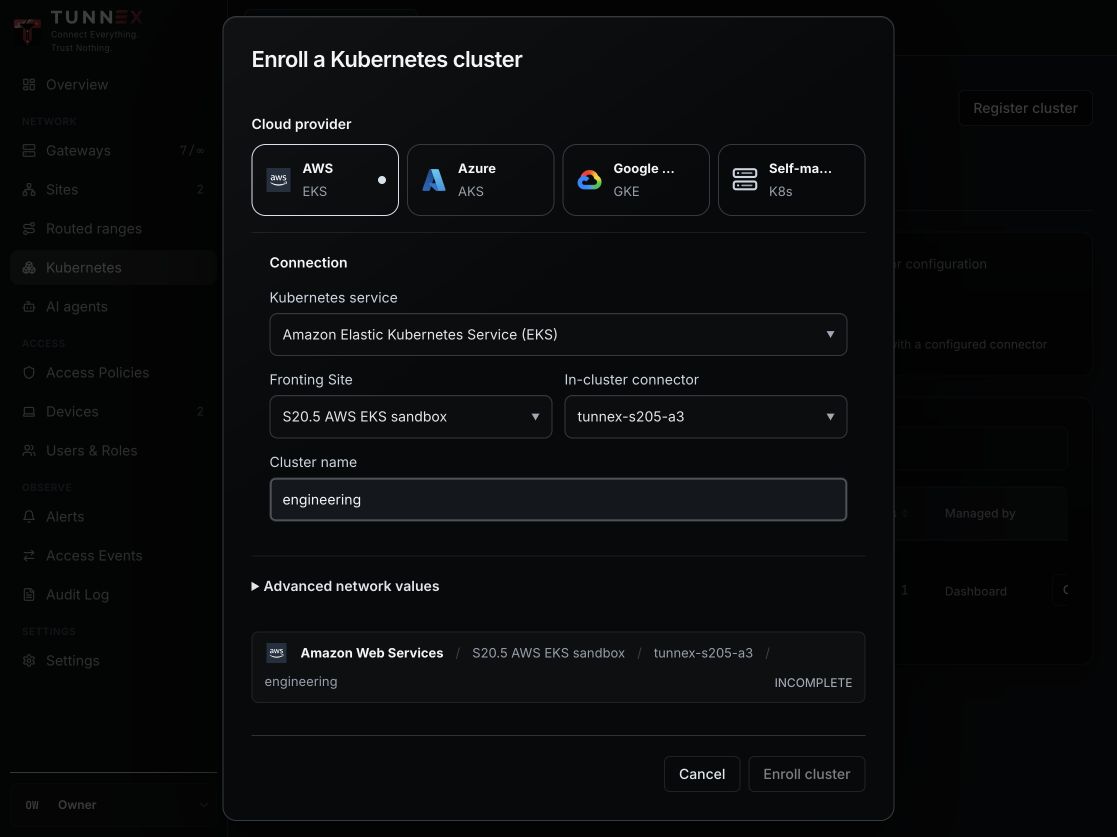
Step 5 — Unsaved provider, site and connector selection. Select your newly installed gateway, not this sandbox’s gateway.
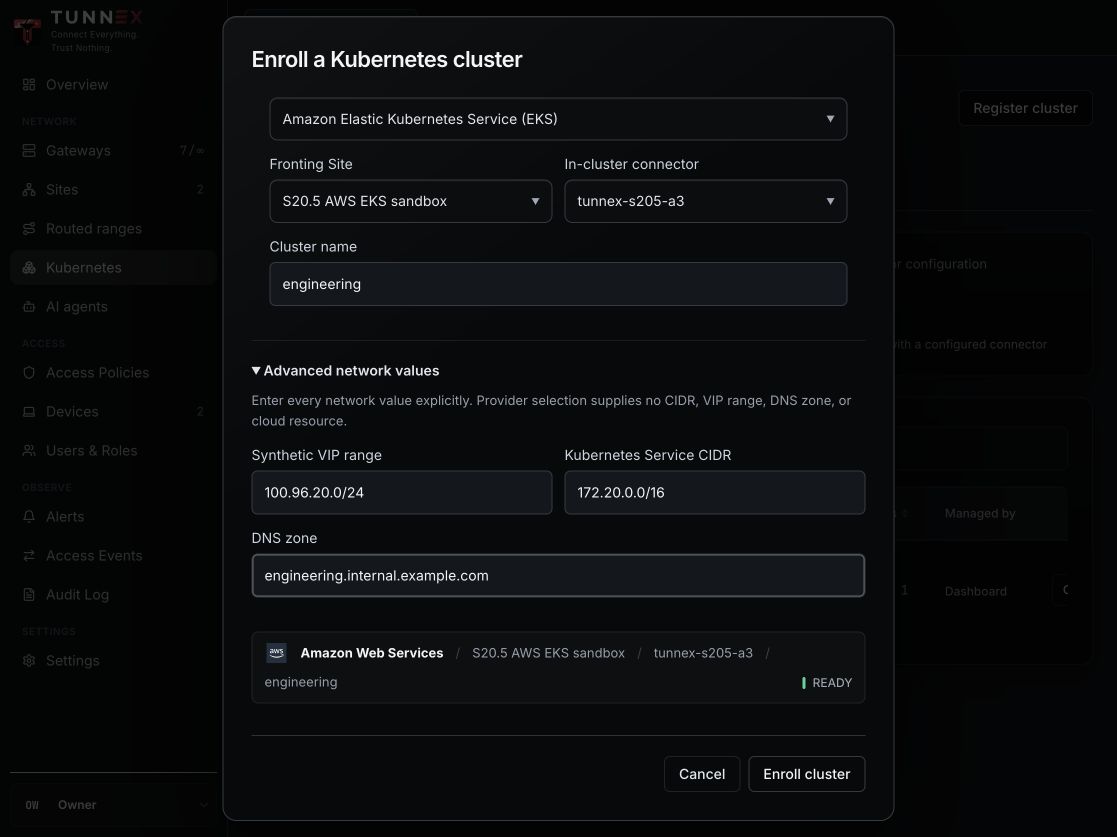
Step 5 — Unsaved networking example. READY means the form is ready to submit, not that Kubernetes is installed. Verify the real Service CIDR and range overlap before enrolling.
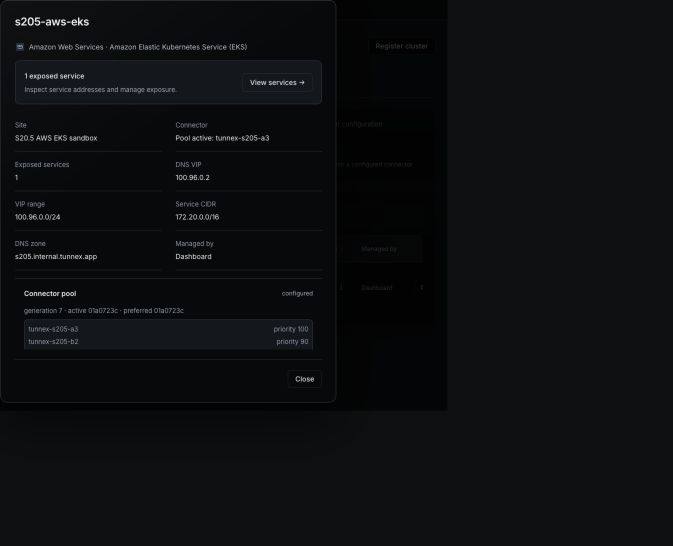
Step 5 — Existing cluster readback. After enrolling yours, verify its connector, DNS VIP, synthetic range, Service CIDR and suffix here.
6. Deploy a private Nginx application
Section titled “6. Deploy a private Nginx application”Save as finance-demo.yaml. This creates a new namespace, two Nginx pods and a
ClusterIP-only Service. For production, replace the example image with your
approved digest-pinned image and use application TLS/authentication.
apiVersion: v1kind: Namespacemetadata: name: finance-demo---apiVersion: apps/v1kind: Deploymentmetadata: name: finance-nginx namespace: finance-demospec: replicas: 2 selector: matchLabels: app: finance-nginx template: metadata: labels: app: finance-nginx spec: containers: - name: nginx image: nginx:stable-alpine ports: - name: http containerPort: 80 readinessProbe: httpGet: path: / port: http resources: requests: cpu: 50m memory: 32Mi limits: cpu: 250m memory: 128Mi---apiVersion: v1kind: Servicemetadata: name: finance-nginx namespace: finance-demospec: type: ClusterIP selector: app: finance-nginx ports: - name: http port: 80 targetPort: http protocol: TCPkubectl apply -f finance-demo.yamlkubectl -n finance-demo rollout status deployment/finance-nginx --timeout=180skubectl -n finance-demo get service finance-nginxkubectl -n finance-demo get endpointslices -l kubernetes.io/service-name=finance-nginxCheckpoint: the deployment is Ready, the Service is ClusterIP (no external load balancer) and EndpointSlices contain ready backends. This checks Kubernetes health, not employee access yet.
7. Expose only the application’s port and grant Finance access
Section titled “7. Expose only the application’s port and grant Finance access”- In Kubernetes → engineering → Expose service, select namespace
finance-demo, Servicefinance-nginxand TCP 80 only. - Copy the assigned VIP and FQDN from the exposed-service row. Do not use the pod IP or Kubernetes ClusterIP as the employee-facing destination.
- Create a
Financegroup under Access Policies → Groups and add your test employee. Manage organization membership under Users & Roles. - In Access Policies, create a rule for that group targeting this exposed
Kubernetes Service and its exact port. Do not grant the entire cluster,
0.0.0.0/0, the VPC CIDR or all ports to make a test pass. - Use Test access, then follow the CP’s enforcement rollout for the selected site/gateway. Check effective policy for conflicting broader rules. A saved rule or simulation-only result is not proof that deny enforcement is active.
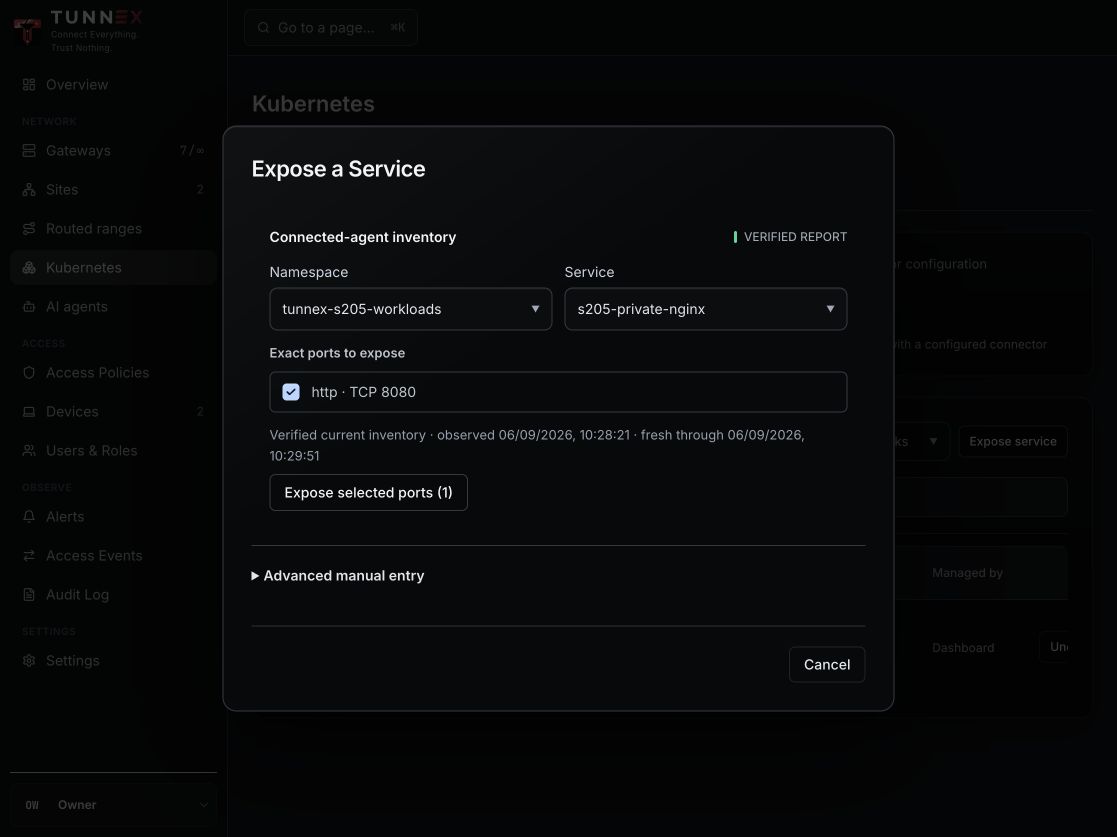
Step 7 — Unsaved exposure selection from the live connector inventory. The
sandbox uses TCP 8080; select TCP 80 for this tutorial’s finance-nginx.
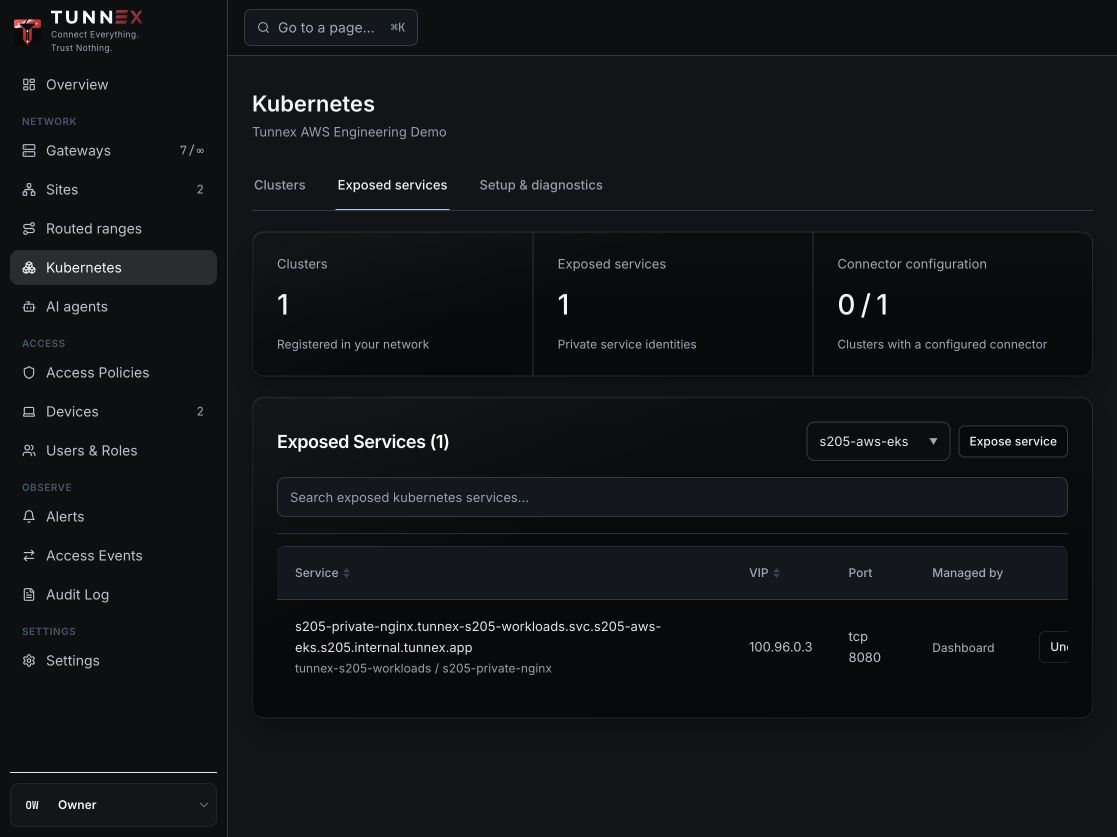
Step 7 — Existing exposure. After saving yours, copy its assigned VIP, complete FQDN and port from this row; verify them from the employee client in step 8.
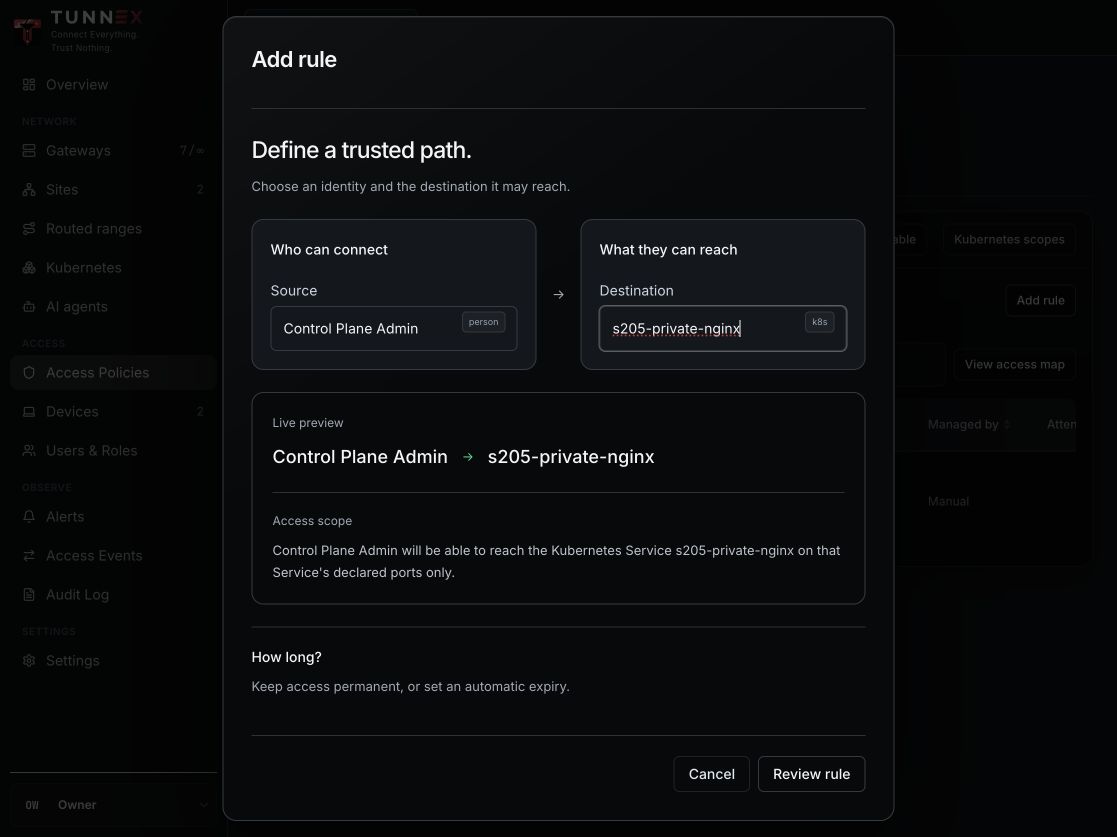
Step 7 — Unsaved rule example. The sandbox uses an individual test identity, ControlPlaneAdmin; choose your Finance group for the team workflow. This image does not demonstrate a Finance group grant.
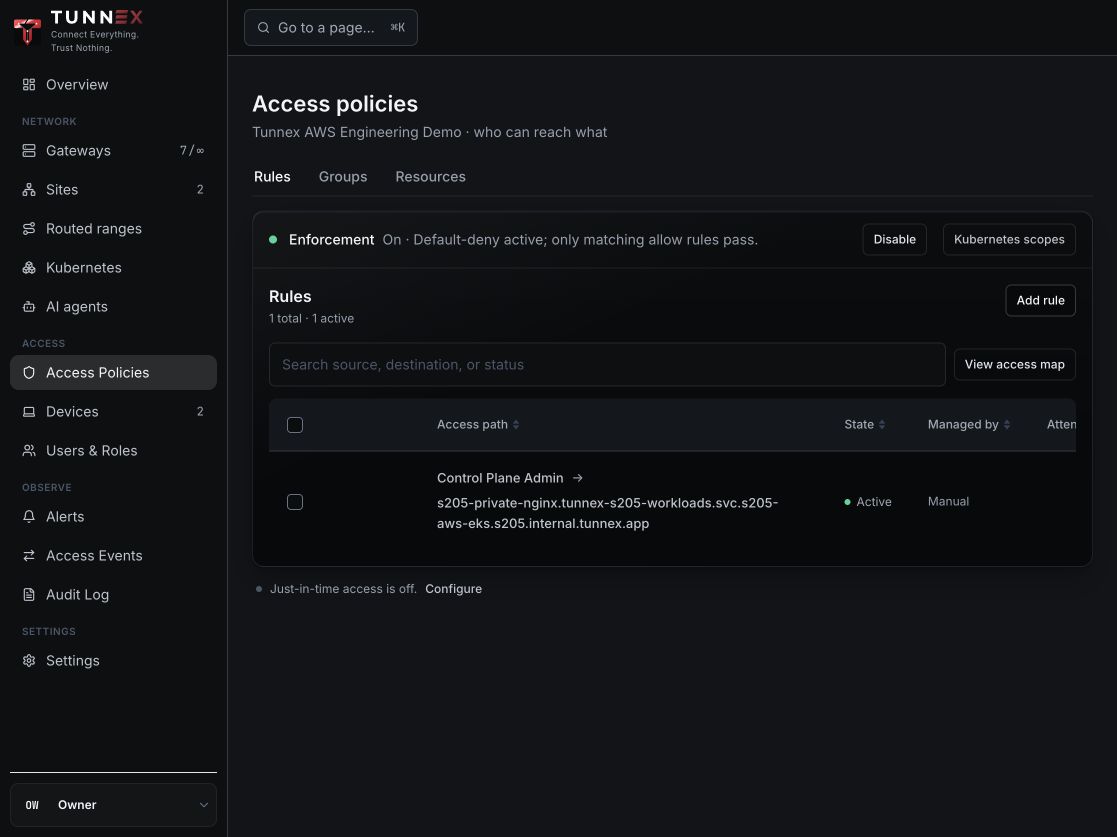
Step 7 — Existing sandbox enforcement state. Verify your own effective rules and run both permitted-user and ungranted-user checks; this screen alone is not proof of either traffic result.
Exposure and authorization are separate. A Tunnex Service grant controls its
network destination and port, not individual URL paths. If /finance and
/hr share the same host and port, enforce path-level authorization in the
application or an authenticated reverse proxy, or use separate Services.
8. Connect an employee and prove IP plus DNS access
Section titled “8. Connect an employee and prove IP plus DNS access”On the employee’s own laptop, install the compatible Tunnex desktop client, sign in to the existing CP and connect through the site/gateway from this guide. If the client instead enters through another gateway, that adds a separate transit path which must be configured and tested; do not silently assume it.
Set these to the actual values displayed in your CP:
SERVICE_VIP='YOUR_ASSIGNED_TUNNEX_VIP'SERVICE_FQDN='YOUR_ASSIGNED_TUNNEX_FQDN'curl --noproxy '*' --connect-timeout 5 "http://$SERVICE_VIP/"curl --noproxy '*' --connect-timeout 5 "http://$SERVICE_FQDN/"Both should return the Nginx welcome page. Open the FQDN URL in the browser too. HTTP is used only for this non-sensitive demo; the tunnel does not replace TLS between the gateway and application for production use.
Live capture limitation: the sandbox returned S20.5_PRIVATE_SERVICE_OK
using normal curl by both VIP and FQDN on TCP 8080 during this capture. Its
.app browser URL attempted HTTPS against the HTTP-only port and produced
ERR_SSL_PROTOCOL_ERROR; there is no browser-success screenshot in this set.
Use correctly configured application HTTPS for browser access and repeat that
check. Do not bypass browser security or count the CP images as browser proof.
Tunnex supplies the private Kubernetes DNS path with the client configuration. You should not type a gateway DNS server into every application or replace your laptop’s global resolver. No Route 53 record is required for this synthetic name. Leave the application Service in place when pods are replaced: deleting and recreating a Service changes its identity and can require revalidation.
If FQDN fails but VIP works:
- On macOS, check
scutil --dnsfor the private suffix and usedscacheutil -q host -a name "$SERVICE_FQDN"plus normalcurl/browser access. - On Linux with systemd-resolved, inspect
resolvectl statusand runresolvectl query "$SERVICE_FQDN". - On Windows PowerShell, use
Resolve-DnsNamewith the copied name andcurl.exefor the HTTP check. nslookup/digcan query a default resolver instead of macOS’s scoped resolver. A public resolver’s NXDOMAIN alone does not diagnose the Tunnex path. An explicit query to the CP-displayed DNS VIP is a diagnostic only, not the final employee acceptance test.
Also test with a second employee who is not in Finance and has no other grant: application access should be denied. Test the permitted employee with the VPN disconnected: the synthetic VIP/name should not provide this path. Inspect access events; do not infer successful enforcement from DNS resolution.
Done for the basic setup: permitted user succeeds by VIP and FQDN, ungranted user is denied, and the application still has no public Service endpoint.
9. Optional: add a second gateway and test HA
Section titled “9. Optional: add a second gateway and test HA”Use a different worker, gateway name, release, endpoint and PVC. Repeat
steps 3–4 for engineering-k8s-b / engineering-b, UDP 31082, and that
worker’s hostname/address. Do not schedule both host-network gateways on one
worker or share their storage. Allow the required gateway-to-gateway UDP sources
as well as employee traffic.
In the cluster’s Setup & diagnostics / connector pool controls, configure both members and deliberately enable HA after validating entitlement, eligibility and the reported effective mode. Helm installation does not create or activate the pool automatically. Check the saved membership list contains both IDs.
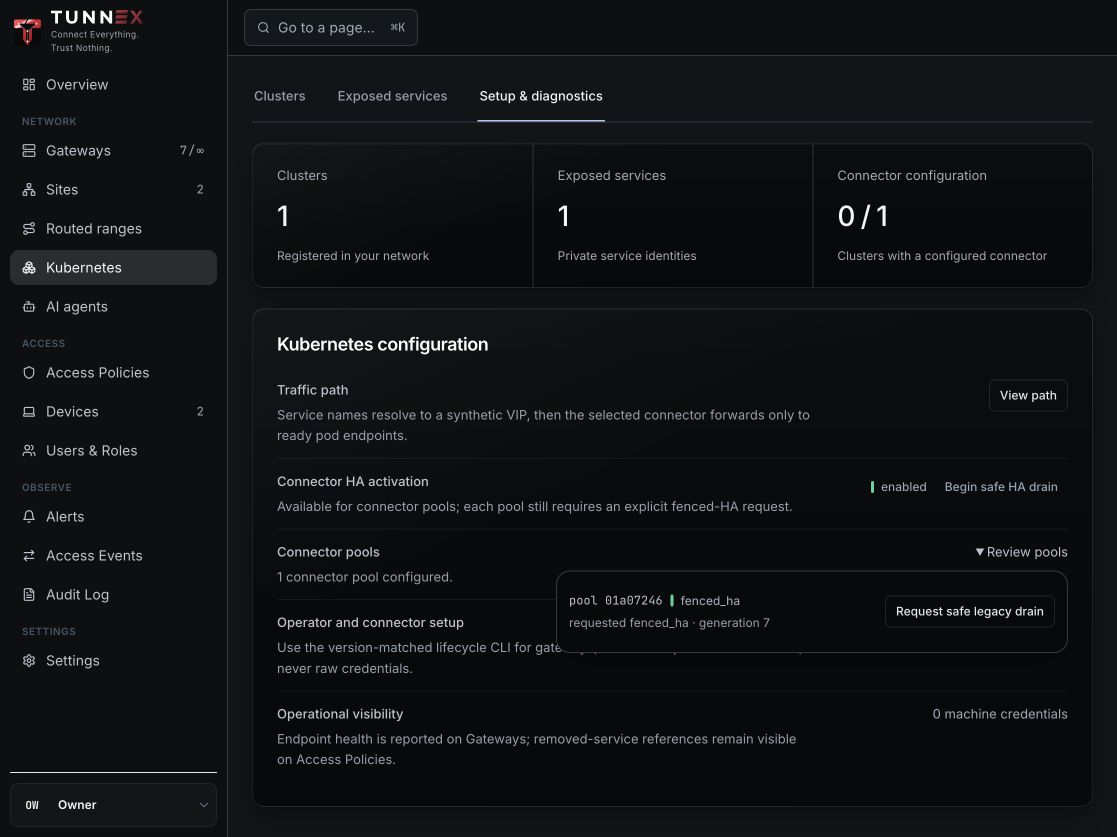
Step 9 — Existing pool reporting enabled HA and fenced_ha. This is a
configuration snapshot, not a failover test. Verify membership, then collect
traffic evidence across lease expiry using the controlled test below.
For a maintenance-window lab test, identify the current active member from fresh CP state, verify both gateways Ready and start paired VIP/FQDN requests. Scale only that member’s exact Deployment to zero; keep its PVC. Observe the new owner and continue traffic beyond the initial serving-lease expiry, then restore the stopped Deployment to one replica. Record outages, continued lease renewal, final readiness, identity and PVC UID. If using a script, ensure it restores the member on error. Never stop the CP or patch host networking as part of this check. Do not perform a destructive fault in customer production without an approved maintenance plan.
The development AWS proof observed automatic takeover in about 84 seconds and a separate failback interruption of about 50 seconds. Those are observations, not an SLA or seamless-failover guarantee. They do not qualify multi-AZ failure, host replacement or other clouds. HA is optional for the basic tutorial.
10. Operate and retain the gateway safely
Section titled “10. Operate and retain the gateway safely”Use the typed CLI lifecycle, not raw token-bearing Helm commands. Check the installed release and target bundle before upgrade; review the plan and allow the CLI to wait for readiness:
tunnex k8s upgrade --context "$CONTEXT" \ --release engineering-a --namespace tunnex --chart-version "$CHART_VERSION"Choose a genuinely intended target version; do not repeatedly upgrade to the same image as a repair. A rollback target must come from actual release history, not a guessed revision. Follow the matching bundle’s compatibility guidance.
Uninstall retains the gateway PVC by default:
tunnex k8s uninstall --context "$CONTEXT" \ --release engineering-a --namespace tunnexTo reinstall that identity, use install --mode reuse --existing-claim with the
exact retained PVC name from inventory and the same reviewed endpoint,
placement, organization and compatible bundle inputs from step 4. Never mint a
fresh enrollment token against a used identity volume. If install is interrupted,
use status/diagnostics and the typed retry or abort-install instruction
printed by the CLI. Do not repeatedly mint tokens or edit lifecycle Secrets.
For lab cleanup, first remove the lab’s grants/exposure and resolve CP references,
then uninstall the gateway releases. Stop here if you want identity reuse.
Deleting the namespace, cluster, PVC or backing disk is not a harmless
uninstall: record exact resources, obtain the appropriate approval and use the
documented purge-state workflow where applicable before infrastructure cleanup.
Retained EBS disks may continue billing. Never include the reused CP or unrelated
VPCs, roles, hosted zones or employee data in a blanket cleanup command.
Troubleshooting and release boundaries
Section titled “Troubleshooting and release boundaries”| Symptom | Check before retrying |
|---|---|
CLI has no k8s command | Wrong/older bundle; do not provision more infrastructure |
| ImagePullBackOff | Worker registry permission, exact image digest and existing pull-Secret name |
| Pending gateway PVC | CSI IAM/add-on, StorageClass, selected node/AZ and scheduling events |
| Gateway not Ready | Typed diagnostics, trusted CP API/agent reachability and host-manager admission |
| Gateway Online but no private traffic | Correct connector/site, ready Service endpoints, actual grant enforcement and UDP endpoint |
| IP works, FQDN fails | Normal client split-DNS suffix/VIP and possible conflicting corporate resolver |
| Traffic recovers once then stops | Sustained lease renewal and exact deployed API version; do not call HA passed on one request |
| Install asks for manual host/PVC/Secret repair | Preserve redacted diagnostics and escalate; that is not successful zero-touch installation |
The optional GitOps operator is intentionally outside this first-app tutorial. Use only a compatible operator image plus gateway, host-posture, operator and CRD charts from the same approved bundle. The older Kubernetes reference’s operator warning applies to its older release, not proof that this preview is publicly shipped. CRD adoption and rollback require separate qualification.
Windows automatic terminal-crash recovery, failed private-candidate rollout recovery and ordinary host-reboot rebootstrap remain named follow-ups. The AWS proof used NodePort, not an NLB; AKS/GKE compatibility intent is not live qualification. Do not advertise these untested guarantees from this guide.