This walkthrough installs a dedicated Tunnex control plane and gateway in
ap-south-1, then proves that a managed desktop client can reach Nginx on an
EC2 instance that has no public IP. It uses the account’s default VPC so an
engineering team can evaluate Tunnex without first designing a new network.
Use this topology as a controlled evaluation. A production deployment should normally use purpose-built subnets, reviewed route tables, private administration paths, at least two gateways where availability matters, and a control-plane hostname in a domain your organization owns.
For the cloud-neutral decision between this guide’s gateway-local resolver, provider-managed inbound endpoints, and a global DNS service, read Cost-optimized private DNS across clouds.
Read Plan your deployment first. The commands use Bash,
AWS CLI v2, OpenSSH, and jq on the operator workstation.
What this builds
Section titled “What this builds”| Component | Example | Final exposure |
|---|---|---|
| Control plane | c7i-flex.large, 2 vCPU, 4 GiB | Public TCP 80/443; TCP 8443 only from the gateway SG |
| Gateway | t3.small, 2 vCPU, 2 GiB | Public UDP 51820; SSH only from the operator |
| Default VPC | 172.31.0.0/16 in ap-south-1 | Advertised as one Tunnex site |
| Tunnex device pool | 10.99.0.0/24 example; verify the live organization | AWS return route points to the gateway ENI |
| Private application | t3.micro, 1 GiB, one visible vCPU | No public IP after provisioning; TCP 80 only from the device pool |
| Private DNS zone | internal.example.com | Route 53 private hosted zone associated only with the selected VPC |
| DNS forwarder | dnsmasq on the gateway private IP | Forwards only the private suffix to the VPC Route 53 Resolver |
| Proof hostname | nginx.internal.example.com | Private A record for the Nginx instance |
The application packet path is:
- The managed desktop client sends
172.31.0.0/16traffic through WireGuard to the gateway’s public UDP endpoint. - The gateway forwards the original device-pool source address into the VPC.
- The application subnet’s route table sends
10.99.0.0/24replies to the gateway ENI. - The gateway returns the reply through WireGuard.
DNS follows a separate path: the client forwards only
internal.example.com queries to dnsmasq on the gateway; dnsmasq forwards
that suffix to the VPC-local Route 53 Resolver at 169.254.169.253.
The control plane distributes identity, policy, routes, and DNS configuration. It is not in the Nginx data path.
1. Check identity, region, account plan, and quota
Section titled “1. Check identity, region, account plan, and quota”Use the intended AWS profile and make the region explicit. Review the identity before creating anything; do not publish the account ID from this output.
export AWS_PROFILE="replace-with-aws-profile"export AWS_REGION="ap-south-1"export AWS_DEFAULT_REGION="$AWS_REGION"
aws sts get-caller-identityaws configure listaws ec2 describe-regions \  --region-names "$AWS_REGION" \  --query 'Regions[].{region:RegionName,status:OptInStatus}' -o table
This build uses five visible vCPUs: two for the control plane, two for the gateway, and one for the proof host. Check the regional On-Demand Standard instance quota and the three shapes before launch:
aws service-quotas get-service-quota \  --service-code ec2 \  --quota-code L-1216C47A \  --query 'Quota.{name:QuotaName,value:Value}' -o table
aws ec2 describe-instance-types \ --instance-types c7i-flex.large t3.small t3.micro \ --query 'InstanceTypes[].{type:InstanceType,vcpus:VCpuInfo.DefaultVCpus,memoryMiB:MemoryInfo.SizeInMiB,architectures:ProcessorInfo.SupportedArchitectures}' \ -o table2. Inventory the default VPC before changing it
Section titled “2. Inventory the default VPC before changing it”Resolve exactly one default VPC, its CIDR, a default subnet, and the main route table. Stop if any lookup is empty or ambiguous.
export VPC_ID="$(aws ec2 describe-vpcs \  --filters Name=is-default,Values=true \  --query 'Vpcs[0].VpcId' -o text)"export VPC_CIDR="$(aws ec2 describe-vpcs \  --vpc-ids "$VPC_ID" \  --query 'Vpcs[0].CidrBlock' -o text)"export SUBNET_ID="$(aws ec2 describe-subnets \  --filters Name=vpc-id,Values="$VPC_ID" Name=default-for-az,Values=true \  --query 'sort_by(Subnets,&AvailabilityZone)[0].SubnetId' -o text)"export MAIN_RT_ID="$(aws ec2 describe-route-tables \  --filters Name=vpc-id,Values="$VPC_ID" Name=association.main,Values=true \  --query 'RouteTables[0].RouteTableId' -o text)"
test "$VPC_ID" != Nonetest "$VPC_CIDR" != Nonetest "$SUBNET_ID" != Nonetest "$MAIN_RT_ID" != None
aws ec2 describe-subnets \  --filters Name=vpc-id,Values="$VPC_ID" \  --query 'sort_by(Subnets,&AvailabilityZone)[].{az:AvailabilityZone,id:SubnetId,cidr:CidrBlock,default:DefaultForAz,autoPublic:MapPublicIpOnLaunch}' \  -o tableaws ec2 describe-route-tables \  --route-table-ids "$MAIN_RT_ID" \  --query 'RouteTables[0].Routes[].{destination:DestinationCidrBlock,gateway:GatewayId,eni:NetworkInterfaceId,state:State}' \  -o tableaws ec2 describe-vpc-attribute --vpc-id "$VPC_ID" --attribute enableDnsSupportaws ec2 describe-vpc-attribute --vpc-id "$VPC_ID" --attribute enableDnsHostnames
Both DNS attributes must be true. Inventory peering, Transit Gateway, VPN,
Network Firewall, custom DHCP options, subnet route-table associations, and
network ACLs before adapting this guide to a non-fresh account.
3. Freeze names and reusable placeholders
Section titled “3. Freeze names and reusable placeholders”Replace the documentation values before continuing. ADMIN_CIDR must be the
single public IPv4 /32 from which you will SSH. CP_HOST must resolve to the
control-plane Elastic IP before the installer requests a certificate.
export PROJECT_TAG="tunnex-aws-vpc-walkthrough"export ADMIN_CIDR="replace-with-your-public-ipv4/32"export CP_HOST="vpn.example.com"export ADMIN_EMAIL="owner@example.com"export PRIVATE_ZONE="internal.example.com"export APP_RECORD="nginx"
export CP_NAME="tunnex-control-plane"export GW_NAME="tunnex-ap-south-1-gateway"export APP_NAME="tunnex-private-nginx"export KEY_NAME="tunnex-aws-vpc-walkthrough"export KEY_FILE="$HOME/.ssh/tunnex-aws-vpc-walkthrough"
For a short-lived evaluation without a managed public zone, a hostname derived from a static IP through an external wildcard-DNS service can satisfy the TLS hostname requirement. That adds a third-party DNS dependency and is not the recommended company deployment. Never use the private Route 53 name as the public control-plane origin.
Resolve the current Canonical Ubuntu 24.04 amd64 image and retain its owner
check in the evidence:
export AMI_ID="$(aws ec2 describe-images \  --owners 099720109477 \  --filters \    Name=name,Values='ubuntu/images/hvm-ssd-gp3/ubuntu-noble-24.04-amd64-server-*' \    Name=state,Values=available \    Name=architecture,Values=x86_64 \  --query 'reverse(sort_by(Images,&CreationDate))[0].ImageId' -o text)"export ROOT_DEVICE="$(aws ec2 describe-images \  --image-ids "$AMI_ID" \  --query 'Images[0].RootDeviceName' -o text)"
test "$AMI_ID" != Nonetest "$ROOT_DEVICE" != Noneaws ec2 describe-images --image-ids "$AMI_ID" \  --query 'Images[0].{id:ImageId,name:Name,owner:OwnerId,architecture:Architecture,created:CreationDate}' \  -o table
Create a dedicated key without overwriting an existing file:
install -d -m 700 "$HOME/.ssh"test ! -e "$KEY_FILE"umask 077aws ec2 create-key-pair \ --key-name "$KEY_NAME" \ --key-type ed25519 \ --tag-specifications "ResourceType=key-pair,Tags=[{Key=Project,Value=${PROJECT_TAG}}]" \ --query KeyMaterial -o text > "$KEY_FILE"chmod 600 "$KEY_FILE"Protect this private key as a credential. For a company deployment, prefer Session Manager or a controlled bastion and remove public SSH after bootstrap.
4. Create least-purpose security groups
Section titled “4. Create least-purpose security groups”Create separate groups so the proof host does not inherit public gateway or control-plane rules:
export CP_SG_ID="$(aws ec2 create-security-group \  --group-name "${PROJECT_TAG}-cp" \  --description 'Tunnex control plane' \  --vpc-id "$VPC_ID" \  --tag-specifications "ResourceType=security-group,Tags=[{Key=Project,Value=${PROJECT_TAG}}]" \  --query GroupId -o text)"export GW_SG_ID="$(aws ec2 create-security-group \  --group-name "${PROJECT_TAG}-gateway" \  --description 'Tunnex gateway' \  --vpc-id "$VPC_ID" \  --tag-specifications "ResourceType=security-group,Tags=[{Key=Project,Value=${PROJECT_TAG}}]" \  --query GroupId -o text)"export APP_SG_ID="$(aws ec2 create-security-group \  --group-name "${PROJECT_TAG}-private-app" \  --description 'Private Nginx proof host' \  --vpc-id "$VPC_ID" \  --tag-specifications "ResourceType=security-group,Tags=[{Key=Project,Value=${PROJECT_TAG}}]" \  --query GroupId -o text)"
aws ec2 authorize-security-group-ingress --group-id "$CP_SG_ID" \  --protocol tcp --port 22 --cidr "$ADMIN_CIDR"aws ec2 authorize-security-group-ingress --group-id "$CP_SG_ID" \  --protocol tcp --port 80 --cidr 0.0.0.0/0aws ec2 authorize-security-group-ingress --group-id "$CP_SG_ID" \  --protocol tcp --port 443 --cidr 0.0.0.0/0aws ec2 authorize-security-group-ingress --group-id "$CP_SG_ID" \  --protocol tcp --port 8443 --source-group "$GW_SG_ID"
aws ec2 authorize-security-group-ingress --group-id "$GW_SG_ID" \  --protocol tcp --port 22 --cidr "$ADMIN_CIDR"aws ec2 authorize-security-group-ingress --group-id "$GW_SG_ID" \  --protocol udp --port 51820 --cidr 0.0.0.0/0aws ec2 authorize-security-group-ingress --group-id "$GW_SG_ID" \  --protocol udp --port 53 --cidr "$VPC_CIDR"aws ec2 authorize-security-group-ingress --group-id "$GW_SG_ID" \  --protocol tcp --port 53 --cidr "$VPC_CIDR"
aws ec2 authorize-security-group-ingress --group-id "$APP_SG_ID" \  --protocol tcp --port 22 --source-group "$GW_SG_ID"
Do not add the application HTTP rule yet. Add it only after reading the live device pool from Tunnex in step 7. Security groups are stateful; confirm any custom network ACL permits both request and ephemeral response traffic.
5. Launch and install the control plane
Section titled “5. Launch and install the control plane”Launch the requested 2-vCPU, 4-GiB host with an encrypted 20-GiB root volume, IMDSv2 required, and no automatically assigned public address:
export CP_INSTANCE_ID="$(aws ec2 run-instances \  --image-id "$AMI_ID" \  --instance-type c7i-flex.large \  --key-name "$KEY_NAME" \  --subnet-id "$SUBNET_ID" \  --security-group-ids "$CP_SG_ID" \  --no-associate-public-ip-address \  --metadata-options HttpTokens=required,HttpEndpoint=enabled \  --block-device-mappings "DeviceName=${ROOT_DEVICE},Ebs={VolumeSize=20,VolumeType=gp3,Encrypted=true,DeleteOnTermination=true}" \  --tag-specifications "ResourceType=instance,Tags=[{Key=Name,Value=${CP_NAME}},{Key=Project,Value=${PROJECT_TAG}}]" \  --query 'Instances[0].InstanceId' -o text)"export CP_EIP_ALLOC_ID="$(aws ec2 allocate-address \  --domain vpc \  --tag-specifications "ResourceType=elastic-ip,Tags=[{Key=Name,Value=${CP_NAME}},{Key=Project,Value=${PROJECT_TAG}}]" \  --query AllocationId -o text)"export CP_PUBLIC_IP="$(aws ec2 describe-addresses \  --allocation-ids "$CP_EIP_ALLOC_ID" \  --query 'Addresses[0].PublicIp' -o text)"
aws ec2 associate-address \  --instance-id "$CP_INSTANCE_ID" \  --allocation-id "$CP_EIP_ALLOC_ID"aws ec2 wait instance-status-ok --instance-ids "$CP_INSTANCE_ID"
export CP_PRIVATE_IP="$(aws ec2 describe-instances \  --instance-ids "$CP_INSTANCE_ID" \  --query 'Reservations[0].Instances[0].PrivateIpAddress' -o text)"test "$CP_PRIVATE_IP" != None
Create or update the public A record for CP_HOST at the authoritative DNS
provider so it points to CP_PUBLIC_IP. Wait for authoritative and public
resolution to agree before installation:
dig +short "$CP_HOST" Atest "$(dig +short "$CP_HOST" A | tail -n 1)" = "$CP_PUBLIC_IP"Install Docker from a maintained source, verify Compose v2, then follow the release-verified control-plane installation. On Ubuntu 24.04, the distribution packages provide a suitable evaluation baseline:
ssh -i "$KEY_FILE" "ubuntu@${CP_PUBLIC_IP}" \  'sudo apt-get update &&   sudo apt-get install -y ca-certificates curl docker.io docker-compose-v2 &&   sudo systemctl enable --now docker &&   sudo docker version &&   sudo docker compose version'
ssh -t -i "$KEY_FILE" "ubuntu@${CP_PUBLIC_IP}"
From the private, non-recorded shell on the control-plane host:
curl -fsSL https://get.tunnex.io -o get.shcurl -fsSL https://get.tunnex.io/SHA256SUMS -o SHA256SUMSsha256sum -c SHA256SUMS --ignore-missingless get.shsudo env \ TUNNEX_DIR=/opt/tunnex \ TUNNEX_PUBLIC_BASE_URL=https://vpn.example.com \ TUNNEX_ADMIN_EMAIL=owner@example.com \ TUNNEX_SMTP=skip \ sh ./get.sh --yesReplace both example values with CP_HOST and ADMIN_EMAIL. The installer
prints a one-time bootstrap credential. Store it directly in a password manager
and do not capture the terminal. Exit the host, then independently prove the
public API. The gateway-origin check in the next step proves the restricted raw
control listener:
curl -fsS "https://${CP_HOST}/healthz"curl -fsS "https://${CP_HOST}/api/v1/meta" | jq '{edition,protocol_version,setup_complete}'/healthz and TCP 8443 are different services. Only ENIs carrying the
gateway security group may reach the raw listener, so an operator-origin
8443 probe should time out by design. Do not widen the security group for
that test, and do not use curl on the non-HTTP listener.
Because this walkthrough puts the gateway in the same VPC, advertise the
control plane’s private address for the raw gateway-control channel. Keep
CP_HOST as the public browser, API, and desktop origin. This avoids sending a
same-VPC gateway to the control plane’s Elastic IP, a path that can time out
instead of hairpinning through the Internet Gateway.
ssh -i "$KEY_FILE" "ubuntu@${CP_PUBLIC_IP}" \  "sudo env CP_PRIVATE_IP='${CP_PRIVATE_IP}' sh -s" <<'REMOTE'set -euumask 077awk -F= -v value="https://${CP_PRIVATE_IP}:8443" '  $1 == "TUNNEX_GATEWAY_CONTROL_URL" {    print "TUNNEX_GATEWAY_CONTROL_URL=" value    seen = 1    next  }  { print }  END {    if (!seen) print "TUNNEX_GATEWAY_CONTROL_URL=" value  }' /opt/tunnex/.env > /opt/tunnex/.env.nextchown root:root /opt/tunnex/.env.nextchmod 600 /opt/tunnex/.env.nextmv /opt/tunnex/.env.next /opt/tunnex/.env
docker compose --project-directory /opt/tunnex \  --env-file /opt/tunnex/.env -f /opt/tunnex/tunnex.yml \  up -d --no-deps --force-recreate apiREMOTE
curl -fsS "https://${CP_HOST}/api/v1/meta" |  jq --arg expected "https://${CP_PRIVATE_IP}:8443" \    -e '.gateway_control_url == $expected'
The console-generated enrollment command will now use that private URL while
retaining the certificate’s pinned tunnex-control server name. Do not replace
the generated server-name value with the private IP.
Open the console, replace the bootstrap password, create the first organization, enroll MFA, and establish a second recovery owner by following First admin and organization. Do not continue with a shared bootstrap password.
6. Launch and prepare the gateway
Section titled “6. Launch and prepare the gateway”Launch a separate gateway with a static public UDP endpoint. The gateway keeps its WireGuard key and forwarding state; do not combine it with the proof host.
export GW_INSTANCE_ID="$(aws ec2 run-instances \  --image-id "$AMI_ID" \  --instance-type t3.small \  --key-name "$KEY_NAME" \  --subnet-id "$SUBNET_ID" \  --security-group-ids "$GW_SG_ID" \  --no-associate-public-ip-address \  --metadata-options HttpTokens=required,HttpEndpoint=enabled \  --block-device-mappings "DeviceName=${ROOT_DEVICE},Ebs={VolumeSize=12,VolumeType=gp3,Encrypted=true,DeleteOnTermination=true}" \  --tag-specifications "ResourceType=instance,Tags=[{Key=Name,Value=${GW_NAME}},{Key=Project,Value=${PROJECT_TAG}}]" \  --query 'Instances[0].InstanceId' -o text)"export GW_EIP_ALLOC_ID="$(aws ec2 allocate-address \  --domain vpc \  --tag-specifications "ResourceType=elastic-ip,Tags=[{Key=Name,Value=${GW_NAME}},{Key=Project,Value=${PROJECT_TAG}}]" \  --query AllocationId -o text)"export GW_PUBLIC_IP="$(aws ec2 describe-addresses \  --allocation-ids "$GW_EIP_ALLOC_ID" \  --query 'Addresses[0].PublicIp' -o text)"
aws ec2 associate-address \  --instance-id "$GW_INSTANCE_ID" \  --allocation-id "$GW_EIP_ALLOC_ID"aws ec2 modify-instance-attribute \  --instance-id "$GW_INSTANCE_ID" \  --no-source-dest-checkaws ec2 wait instance-status-ok --instance-ids "$GW_INSTANCE_ID"
export GW_PRIVATE_IP="$(aws ec2 describe-instances \  --instance-ids "$GW_INSTANCE_ID" \  --query 'Reservations[0].Instances[0].PrivateIpAddress' -o text)"export GW_ENI_ID="$(aws ec2 describe-instances \  --instance-ids "$GW_INSTANCE_ID" \  --query 'Reservations[0].Instances[0].NetworkInterfaces[0].NetworkInterfaceId' -o text)"
The gateway-security-group 8443 rule created earlier covers this
private-source path. Do not expose 8443 to the whole VPC or Internet, and do
not depend on same-VPC access through the control plane’s Elastic IP.
Install Docker, WireGuard tools, the DNS forwarder binary, and persistent IPv4 forwarding:
ssh -i "$KEY_FILE" "ubuntu@${GW_PUBLIC_IP}" \  'sudo apt-get update &&   sudo apt-get install -y ca-certificates curl docker.io docker-compose-v2 wireguard-tools dnsutils dnsmasq-base netcat-openbsd &&   sudo systemctl enable --now docker &&   printf "%s\n" "net.ipv4.ip_forward=1" |     sudo tee /etc/sysctl.d/99-tunnex-router.conf >/dev/null &&   sudo sysctl --system >/dev/null &&   test "$(sysctl -n net.ipv4.ip_forward)" = 1 &&   test -c /dev/net/tun &&   sudo docker version'
ssh -i "$KEY_FILE" "ubuntu@${GW_PUBLIC_IP}" \  "curl -fsS 'https://${CP_HOST}/healthz'; nc -vz '${CP_PRIVATE_IP}' 8443"
Enroll the gateway
Section titled “Enroll the gateway”Follow Gateways and use these values:
- Open Gateways → Enroll gateway.
- Name it
tunnex-ap-south-1-gateway. - Set Public endpoint to
GW_PUBLIC_IP:51820. - Generate a join token and copy the release-generated Docker command.
- Open a temporary no-history gateway shell and run that exact command once.
ssh -t -i "$KEY_FILE" "ubuntu@${GW_PUBLIC_IP}" \ 'HISTFILE=/dev/null exec bash --noprofile --norc -i'# Paste the one-time command copied from the Tunnex console, then exit.Verify the gateway becomes active, Last seen advances, and runtime/version fields are present. On the host, verify the container and WireGuard state using the actual container name returned by Docker:
ssh -i "$KEY_FILE" "ubuntu@${GW_PUBLIC_IP}" \ 'sudo docker ps; sudo wg show; ip -4 address show dev wg0; sysctl net.ipv4.ip_forward'The gateway address must be the first usable address in the live organization
pool; for the verified 10.99.0.0/24 pool it was 10.99.0.1/24.
Enrollment proves control connectivity. The desktop handshake and Nginx request
later prove UDP 51820 and the routed data path.
7. Route the VPC and add the AWS return route
Section titled “7. Route the VPC and add the AWS return route”In the Tunnex console, open Routed ranges and Settings. Copy the exact
live organization device pool. The default is often 10.99.0.0/24, but the
route must use the value in this organization:
export DEVICE_POOL_CIDR="10.99.0.0/24" # Replace with the live console value.Re-run the overlap review with that value. Then create the site:
- Open Sites and select Route a LAN.
- Choose the new AWS gateway.
- Enter the default VPC CIDR from
VPC_CIDR, for example172.31.0.0/16. - Name the site
AWS ap-south-1 default VPCand select Route LAN. - Confirm the approved CIDR appears under Routed ranges and wait for the gateway to apply the revision.
Routing the full default VPC is convenient for this evaluation. In production, advertise only reviewed workload prefixes when that produces the intended access boundary.
AWS still needs a return route for the device pool. First prove no route already owns that exact destination:
aws ec2 describe-route-tables \ --route-table-ids "$MAIN_RT_ID" \ --query "RouteTables[0].Routes[?DestinationCidrBlock=='${DEVICE_POOL_CIDR}']" \ -o jsonThe expected result before creation is []. If another route exists, stop and
identify its owner; do not replace it as a shortcut. Create the route to the
gateway’s private ENI, not its public IP:
aws ec2 create-route \  --route-table-id "$MAIN_RT_ID" \  --destination-cidr-block "$DEVICE_POOL_CIDR" \  --network-interface-id "$GW_ENI_ID"
aws ec2 describe-instance-attribute \  --instance-id "$GW_INSTANCE_ID" \  --attribute sourceDestCheckaws ec2 describe-route-tables \  --route-table-ids "$MAIN_RT_ID" \  --query "RouteTables[0].Routes[?DestinationCidrBlock=='${DEVICE_POOL_CIDR}'].{destination:DestinationCidrBlock,eni:NetworkInterfaceId,state:State}" \  -o table
Expected results are SourceDestCheck.Value: false, the exact gateway ENI, and
route state active.
The main route table controls subnets with no explicit association. If a target instance is in a subnet associated with another route table, add the same reviewed return route to that table as well. Never replace a subnet’s route table merely to follow this guide.
Finally, allow only the proof traffic from the live device pool:
aws ec2 authorize-security-group-ingress --group-id "$APP_SG_ID" \ --protocol tcp --port 80 --cidr "$DEVICE_POOL_CIDR"To reach other VPC machines, their security group, network ACL, and host firewall must likewise allow the required protocol and port from the device pool. A Tunnex route does not bypass AWS authorization.
8. Create the private Nginx proof host
Section titled “8. Create the private Nginx proof host”The host finishes with no public IPv4 address. Because a default subnet has an Internet Gateway but no NAT gateway, this walkthrough temporarily associates an Elastic IP only while cloud-init installs Nginx, then removes it. Its security group never allows direct Internet ingress.
Create a local user-data file that retries while the temporary egress mapping converges:
export APP_USER_DATA="$(mktemp)"chmod 600 "$APP_USER_DATA"cat > "$APP_USER_DATA" <<'CLOUDINIT'#!/bin/shset -eu
attempt=0until apt-get update; do  attempt=$((attempt + 1))  test "$attempt" -lt 30  sleep 10done
DEBIAN_FRONTEND=noninteractive apt-get install -y nginxcat > /var/www/html/index.html <<'HTML'<!doctype html><html lang="en">  <head><meta charset="utf-8"><title>Tunnex AWS private path</title></head>  <body>    <h1>Tunnex AWS private path is working</h1>    <p id="result">nginx-private-vpc-ok</p>  </body></html>HTMLsystemctl enable --now nginxcurl -fsS http://127.0.0.1/ | grep -q nginx-private-vpc-okCLOUDINIT
Launch a 1-GiB t3.micro with one core and one thread exposed to the operating
system:
export APP_INSTANCE_ID="$(aws ec2 run-instances \  --image-id "$AMI_ID" \  --instance-type t3.micro \  --cpu-options CoreCount=1,ThreadsPerCore=1 \  --key-name "$KEY_NAME" \  --subnet-id "$SUBNET_ID" \  --security-group-ids "$APP_SG_ID" \  --no-associate-public-ip-address \  --metadata-options HttpTokens=required,HttpEndpoint=enabled \  --block-device-mappings "DeviceName=${ROOT_DEVICE},Ebs={VolumeSize=8,VolumeType=gp3,Encrypted=true,DeleteOnTermination=true}" \  --user-data "file://${APP_USER_DATA}" \  --tag-specifications "ResourceType=instance,Tags=[{Key=Name,Value=${APP_NAME}},{Key=Project,Value=${PROJECT_TAG}}]" \  --query 'Instances[0].InstanceId' -o text)"rm -f "$APP_USER_DATA"
export APP_EIP_ALLOC_ID="$(aws ec2 allocate-address \  --domain vpc \  --tag-specifications "ResourceType=elastic-ip,Tags=[{Key=Name,Value=${APP_NAME}-bootstrap},{Key=Project,Value=${PROJECT_TAG}}]" \  --query AllocationId -o text)"export APP_EIP_ASSOC_ID="$(aws ec2 associate-address \  --instance-id "$APP_INSTANCE_ID" \  --allocation-id "$APP_EIP_ALLOC_ID" \  --query AssociationId -o text)"
aws ec2 wait instance-status-ok --instance-ids "$APP_INSTANCE_ID"export APP_PRIVATE_IP="$(aws ec2 describe-instances \  --instance-ids "$APP_INSTANCE_ID" \  --query 'Reservations[0].Instances[0].PrivateIpAddress' -o text)"
Reach the private SSH address through the gateway and verify cloud-init, Nginx, CPU, and memory before removing temporary egress:
ssh -i "$KEY_FILE" -J "ubuntu@${GW_PUBLIC_IP}" \  "ubuntu@${APP_PRIVATE_IP}" \  'cloud-init status --wait &&   test "$(nproc)" = 1 &&   free -h &&   curl -fsS http://127.0.0.1/ | grep nginx-private-vpc-ok'
aws ec2 disassociate-address --association-id "$APP_EIP_ASSOC_ID"aws ec2 release-address --allocation-id "$APP_EIP_ALLOC_ID"
aws ec2 describe-instances --instance-ids "$APP_INSTANCE_ID" \  --query 'Reservations[0].Instances[0].{private:PrivateIpAddress,public:PublicIpAddress,state:State.Name}' \  -o json
Expected result: public is null, the instance is running, and only its
RFC1918 address remains. If provisioning failed, diagnose it before removing
the temporary EIP; do not open SSH or HTTP to the Internet.
9. Create Route 53 private DNS and the gateway forwarder
Section titled “9. Create Route 53 private DNS and the gateway forwarder”Use a private subdomain of a domain your company controls. It does not require public delegation, and its RFC1918 record must not be copied into a public hosted zone.
export PRIVATE_ZONE_ID="$(aws route53 create-hosted-zone \  --name "$PRIVATE_ZONE" \  --vpc "VPCRegion=${AWS_REGION},VPCId=${VPC_ID}" \  --hosted-zone-config "Comment=Tunnex private VPC walkthrough,PrivateZone=true" \  --caller-reference "${PROJECT_TAG}-$(date +%s)" \  --query 'HostedZone.Id' -o text)"
export DNS_CHANGE="$(jq -n \  --arg name "${APP_RECORD}.${PRIVATE_ZONE}" \  --arg ip "$APP_PRIVATE_IP" \  '{Changes:[{Action:"UPSERT",ResourceRecordSet:{Name:$name,Type:"A",TTL:60,ResourceRecords:[{Value:$ip}]}}]}')"
export DNS_CHANGE_ID="$(aws route53 change-resource-record-sets \  --hosted-zone-id "$PRIVATE_ZONE_ID" \  --change-batch "$DNS_CHANGE" \  --query 'ChangeInfo.Id' -o text)"
aws route53 wait resource-record-sets-changed --id "$DNS_CHANGE_ID"
aws route53 list-resource-record-sets \  --hosted-zone-id "$PRIVATE_ZONE_ID" \  --query 'ResourceRecordSets[?Type==`A`]' -o table
First prove Route 53 from the gateway over both DNS transports. The AWS
link-local resolver address works from EC2 and avoids hard-coding the VPC +2
address:
ssh -i "$KEY_FILE" "ubuntu@${GW_PUBLIC_IP}" \ "dig +short @169.254.169.253 '${APP_RECORD}.${PRIVATE_ZONE}' A; dig +tcp +short @169.254.169.253 '${APP_RECORD}.${PRIVATE_ZONE}' A"Both commands must return only APP_PRIVATE_IP. Stop if they do not.
The verified deployment used the equivalent VPC +2 address
(172.31.0.2) in its dnsmasq service, and the same gateway also returned the
record over 169.254.169.253 with UDP and TCP. Pick one VPC-local resolver and
use it consistently; never advertise either AWS-only resolver directly to a
remote client.
Configure dnsmasq to listen only on loopback and the gateway private address,
and to forward only this suffix to Route 53:
ssh -i "$KEY_FILE" "ubuntu@${GW_PUBLIC_IP}" \  "sudo env GW_PRIVATE_IP='${GW_PRIVATE_IP}' PRIVATE_ZONE='${PRIVATE_ZONE}' sh -s" <<'REMOTE'set -eu
cat > /tmp/tunnex-dns-forwarder.service <<UNIT[Unit]Description=Tunnex private-zone DNS forwarderAfter=network-online.targetWants=network-online.target
[Service]Type=simpleExecStart=/usr/sbin/dnsmasq --keep-in-foreground --port=53 --bind-interfaces --listen-address=127.0.0.1 --listen-address=${GW_PRIVATE_IP} --no-resolv --server=/${PRIVATE_ZONE}/169.254.169.253 --cache-size=1000Restart=on-failureRestartSec=2
[Install]WantedBy=multi-user.targetUNIT
sudo install -o root -g root -m 0644 \  /tmp/tunnex-dns-forwarder.service \  /etc/systemd/system/tunnex-dns-forwarder.servicerm -f /tmp/tunnex-dns-forwarder.servicesudo systemctl daemon-reloadsudo systemctl enable --now tunnex-dns-forwarder.servicesudo systemctl --no-pager --full status tunnex-dns-forwarder.serviceREMOTE
Verify the gateway’s own private endpoint, again over UDP and TCP:
ssh -i "$KEY_FILE" "ubuntu@${GW_PUBLIC_IP}" \ "dig +short @'${GW_PRIVATE_IP}' '${APP_RECORD}.${PRIVATE_ZONE}' A; dig +tcp +short @'${GW_PRIVATE_IP}' '${APP_RECORD}.${PRIVATE_ZONE}' A"Publish the suffix through the Tunnex site
Section titled “Publish the suffix through the Tunnex site”- Open Sites and expand
AWS ap-south-1 default VPC. - Expand Cross-site DNS forwarding: resolve this site’s names from other sites.
- Enter
PRIVATE_ZONEas the domain andGW_PRIVATE_IPas the resolver IP. - Select Add.
- Open Routed ranges and confirm the suffix appears under Reachable DNS forwards.
The resolver IP is inside the approved VPC range. Tunnex withholds a DNS forward whose resolver is outside every routed range, preventing clients from receiving a known-dead resolver.
This site DNS forward is sufficient to project the private suffix to a managed
desktop client. It does not itself grant HTTP access. When policy enforcement
is enabled, add a narrow CIDR or host /32 resource and an allow rule for the
intended engineering group before testing. Exact-hostname resources require a
plan with the fqdn_resources entitlement; Community deployments can still
use this Site DNS forward with CIDR/host resources.
Optional: register the exact hostname in the control plane
Section titled “Optional: register the exact hostname in the control plane”The private hosted-zone record, Site DNS forward, and FQDN resource serve different purposes:
- Route 53 stores
nginx.internal.example.comand answers only through a resolver with access to the associated VPC. - The Site DNS forward projects the private suffix and reachable resolver to managed desktops.
- A private resolver profile lets the Tunnex gateway resolve and refresh the exact answers used by an FQDN policy resource.
No global or catch-all resolver is required for this design. Public resolvers
cannot see a Route 53 private hosted zone, and the VPC +2 or AWS link-local
resolver must not be advertised directly to a remote desktop. The gateway is
already inside the VPC, so its private dnsmasq endpoint accepts the tunneled
query and forwards only PRIVATE_ZONE to AmazonProvidedDNS locally.
For a plan with the fqdn_resources entitlement:
- Open Access Policies → Resources → FQDN and select the AWS Site and its gateway under Private DNS resolvers.
- Choose Configure profiles or Edit profiles. Create an AWS profile
named
AWS private DNS via gateway, enterPRIVATE_ZONEas its suffix, and addGW_PRIVATE_IPon UDP53. Independently verify that the same listener accepts TCP53for fallback. Add a separate TCP profile member only when you deliberately want both transports to be mandatory consensus checks. - Activate the profile, then repeat the direct UDP and TCP gateway queries.
- Review and enable the separate organization FQDN enforcement opt-in so the resolver generation can run. This setting is independent of the organization’s global Zero Trust/default-deny mode.
- Create an exact-hostname resource named
AWS private Nginxfor${APP_RECORD}.${PRIVATE_ZONE}, protocol TCP, port80, using the same Site and gateway. Wait for the resource to become Healthy.
For the same suffix, keep the Site DNS-forward IP and the resolver-profile
endpoint aligned. For example, do not point the Site forward at
GW_PRIVATE_IP while pointing the profile directly at the VPC +2 address;
conflicting authority paths fail closed. The verified evaluation used the
gateway private address on port 53 for both paths, while dnsmasq forwarded
upstream to 172.31.0.2 inside the VPC.
The verified resource AWS private Nginx became Healthy with one answer,
172.31.33.201, for nginx.internal.tunnex.app on TCP 80. Global Zero Trust
mode remained Off, and no FQDN access rule was created, so this staged the
exact resource without introducing default-deny behavior. In this evaluation,
the Site DNS forward provides desktop name resolution and the existing open
mesh permits the HTTP proof; the healthy FQDN resource does not itself grant
traffic.
For a production AWS hybrid-DNS design, a paid Route 53 Resolver inbound
endpoint is the managed alternative to gateway dnsmasq. The endpoint requires
multiple addresses for its provider availability model, but a Tunnex Site DNS
forward projects one resolver IP for an exact suffix. Select one reachable,
monitored address as the current endpoint, keep the other as a tested manual
cutover target, or retain a stable gateway proxy/VIP in front. Multiple profile
members are strict consensus, not DNS failover. Allow UDP and TCP 53, validate
the device-pool return path, and do not substitute a public resolver; it still
cannot resolve the private hosted zone.
If you queried the suffix before creating the private zone, an existing local
resolver can retain the negative answer until its SOA negative TTL expires.
Re-check the private hosted-zone association, query Route 53 directly as above,
then wait for or clear only the affected cache. Restarting dnsmasq clears its
own cache, but it cannot clear a negative answer retained by AmazonProvidedDNS
or the EC2 resolver path; that upstream entry must expire. Do not recreate a
healthy zone to chase a cached NXDOMAIN.
10. Prove private IP and private DNS from a managed desktop
Section titled “10. Prove private IP and private DNS from a managed desktop”Install the release-matched desktop client, sign in to this control plane, select the managed Tunnex account profile, choose Only Tunnex routes, and connect. Static WireGuard imports do not receive dynamic site DNS-forward updates.
Do not treat Connected as complete proof. Verify the route, application, native resolver, and server log independently.
macOS proof
Section titled “macOS proof”# Reuse APP_PRIVATE_IP from the AWS provisioning step.: "${APP_PRIVATE_IP:?set by the AWS provisioning step}": "${APP_RECORD:?set in the placeholder step}": "${PRIVATE_ZONE:?set in the placeholder step}"export APP_FQDN="${APP_RECORD}.${PRIVATE_ZONE}"
route -n get "$APP_PRIVATE_IP"curl --fail --show-error --max-time 10 "http://${APP_PRIVATE_IP}/" | grep nginx-private-vpc-ok
scutil --dns | grep -A 8 -B 2 "$PRIVATE_ZONE"dscacheutil -q host -a name "$APP_FQDN"curl --fail --show-error --max-time 10 "http://${APP_FQDN}/" | grep nginx-private-vpc-okThe route output must name a Tunnex utun interface. dscacheutil and curl
use macOS native resolver selection. Plain nslookup and unqualified dig
normally query the default Wi-Fi DNS server and can bypass a suffix-scoped
/etc/resolver rule. They can therefore return NXDOMAIN even while native
lookup and FQDN HTTP work through Tunnex; that result alone is not proof of a
broken Tunnex resolver.
To distinguish endpoint health from macOS resolver selection, specify the gateway resolver explicitly:
dig +short @"$GW_PRIVATE_IP" "$APP_FQDN" Adig +tcp +short @"$GW_PRIVATE_IP" "$APP_FQDN" Anslookup "$APP_FQDN" "$GW_PRIVATE_IP"These direct queries must return APP_PRIVATE_IP, but they deliberately bypass
native resolver selection. Use scutil --dns, dscacheutil, and the FQDN
curl above for the end-to-end macOS proof.
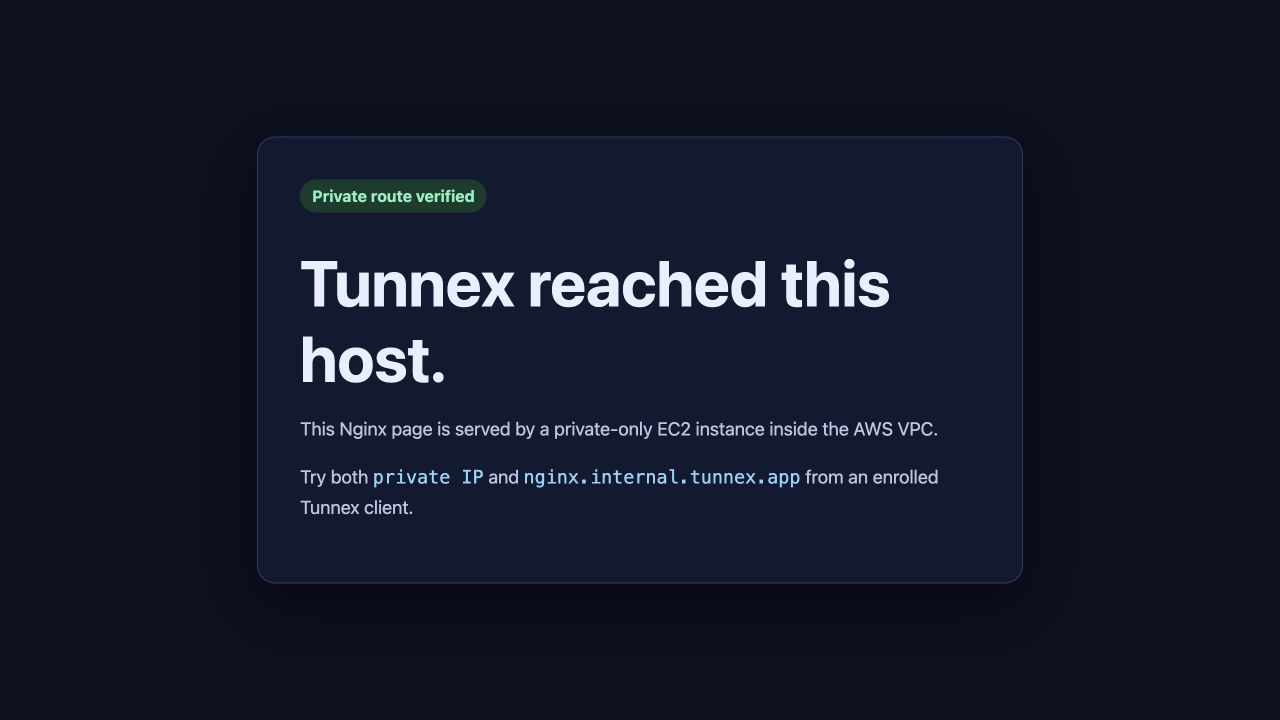
The verified reference run reached the private-only instance at
172.31.33.201 both by IP and as nginx.internal.tunnex.app. macOS selected
utun6, native DNS returned the same RFC1918 address, and both HTTP requests
returned status 200.
local_route=utun6local_dns=172.31.33.201local_ip_http=200 172.31.33.201local_fqdn_http=200 172.31.33.201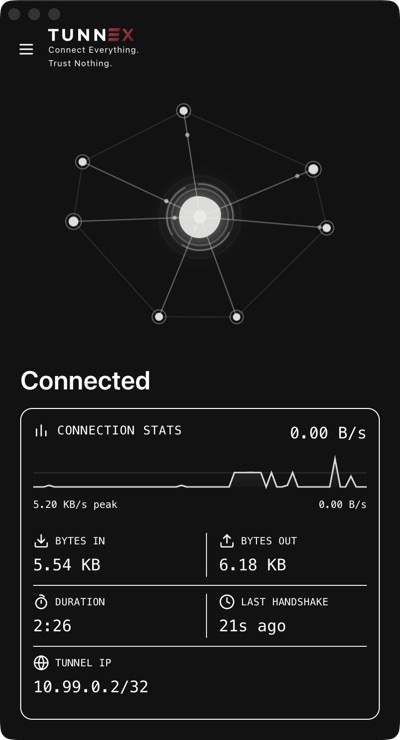
Windows PowerShell proof
Section titled “Windows PowerShell proof”# Reuse the values reported by the AWS provisioning and Route 53 steps.$AppPrivateIp = $env:APP_PRIVATE_IP$AppFqdn = "$($env:APP_RECORD).$($env:PRIVATE_ZONE)"
if ([string]::IsNullOrWhiteSpace($AppPrivateIp) -or [string]::IsNullOrWhiteSpace($env:APP_RECORD) -or [string]::IsNullOrWhiteSpace($env:PRIVATE_ZONE)) { throw 'Set APP_PRIVATE_IP, APP_RECORD, and PRIVATE_ZONE from the provisioning steps.'}
Get-NetRoute -AddressFamily IPv4 | Where-Object { $_.DestinationPrefix -eq '172.31.0.0/16' }curl.exe --fail --show-error --max-time 10 "http://$AppPrivateIp/"
Resolve-DnsName $AppFqdn -Type Acurl.exe --fail --show-error --max-time 10 "http://$AppFqdn/"Replace the example VPC prefix in the Windows route filter when the live VPC differs.
Corroborate from AWS and the gateway
Section titled “Corroborate from AWS and the gateway”aws ec2 describe-instances --instance-ids "$APP_INSTANCE_ID" \ --query 'Reservations[0].Instances[0].{private:PrivateIpAddress,public:PublicIpAddress,state:State.Name}' \ -o json
ssh -i "$KEY_FILE" "ubuntu@${GW_PUBLIC_IP}" \ 'sudo wg show'
ssh -i "$KEY_FILE" -J "ubuntu@${GW_PUBLIC_IP}" \ "ubuntu@${APP_PRIVATE_IP}" \ 'sudo tail -n 20 /var/log/nginx/access.log'A valid proof has all of these properties:
- AWS reports no public IP on the application instance.
- The desktop route uses the Tunnex interface.
- The gateway reports a recent peer handshake and increasing transfer counters.
- HTTP by private IP returns
nginx-private-vpc-ok. - Native DNS returns the same private IP and HTTP by FQDN returns the marker.
- Nginx records both requests.
11. Turn the evaluation into engineering-team access
Section titled “11. Turn the evaluation into engineering-team access”Routing establishes a path; policy decides who may use it. Before inviting a team:
- Create groups that reflect roles such as
Application engineers,Production on-call, andDatabase operators. - Create narrow resources for application subnets or hosts and only the required protocols and ports. Do not make the entire default VPC an all-ports entitlement merely because it is routed.
- Use Test access for representative users before enabling enforcement.
- Create and verify an operator recovery rule, then enable default-deny policy deliberately by following Test and enforce policy.
- Enroll MFA for every operator, add a second owner, configure SMTP or a controlled manual invitation process, and review Access events and audit. Organization-wide MFA enforcement requires the corresponding plan entitlement.
- Back up both PostgreSQL and the separate Tunnex master key. A database dump without the exact master key is not a complete recovery set.
- If the deployment has the
multi_gatewayentitlement, add a second independently reachable gateway and rehearse the AWS return-route change for ordinary Site/CIDR resources. For an exact-FQDN resource, generation history prevents deletion and same-hostname recreation. A context rebind requires a controlled outage: delete all referencing rules, retire the old resolver configuration, approve the resource-update impact preview, rebind the existing resource, wait for a new healthy generation, switch and verify the AWS return route, then recreate the rules. Community supports one gateway; Tunnex does not make this automatic or zero-downtime.
Example least-privilege outcomes:
| Group | Resource | Scope |
|---|---|---|
| Application engineers | Private app hosts | TCP 80/443 |
| Production on-call | Reviewed production admin hosts | TCP 22 |
| Database operators | Database subnet or exact servers | Database port only |
| All employees | Nothing by default | Explicit grants only |
AWS security groups must allow the same device-pool source and ports. Keep the Tunnex rule and AWS rule aligned; neither replaces the other.
Evidence capture checklist
Section titled “Evidence capture checklist”Capture only after each view has finished loading and every command has completed. Redact AWS account IDs, instance and ENI IDs, public IPs, email addresses, browser session values, and local usernames before publication. Private RFC1918 addresses and a synthetic tutorial hostname are acceptable.
- EC2 inventory showing control-plane 2-vCPU/4-GiB shape, separate gateway, and private application host;
- gateway instance networking showing source/destination check disabled;
- route table showing the device pool routed to the gateway ENI;
- Tunnex gateway detail showing active lifecycle and a recent last-seen value;
- Tunnex site and routed-range views showing the approved VPC CIDR and reachable DNS forward;
- Route 53 private zone showing the Nginx private A record and VPC association;
- desktop managed profile showing connected state;
- local terminal proof for the private-IP and FQDN HTTP requests; and
- AWS application inventory showing
PublicIpAddress: null.
Never capture the bootstrap password, installer output that contains it, gateway join token or command, WireGuard private key, cookies, authorization callback, SSH private key, or an unredacted diagnostic bundle.
Troubleshoot in dependency order
Section titled “Troubleshoot in dependency order”| Result | Check next |
|---|---|
| Gateway never becomes active | TCP 8443, control hostname/SNI, Docker logs, system clock, and the one-time token result |
| Desktop has no handshake | Public UDP 51820, gateway EIP, security group, endpoint value, local egress, and gateway container |
| Handshake works but private-IP HTTP times out | Site approval, applied revision, policy, IP forwarding, source/destination check, app SG/NACL, and return route |
| IP works but direct gateway DNS fails | Private-zone VPC association, A record, VPC DNS attributes, dnsmasq listener, and UDP/TCP 53 |
| Direct gateway DNS works but native lookup fails | Reachable DNS forward, managed profile, client refresh/reconnect, and OS suffix projection |
| FQDN resolves but HTTP fails | Returned address, Tunnex rule, application SG, route, listener, and host firewall |
Route is blackhole | Gateway ENI/instance was replaced or stopped; repair the target deliberately |
Capture packet evidence only after the configuration checks. On the gateway,
compare sudo wg show, ip route, and narrow tcpdump filters for the single
test address; remove packet captures when the investigation ends.
Roll back without damaging the default VPC
Section titled “Roll back without damaging the default VPC”If the new return route disrupts traffic, remove only the exact route created by this walkthrough:
aws ec2 delete-route \ --route-table-id "$MAIN_RT_ID" \ --destination-cidr-block "$DEVICE_POOL_CIDR"Verify the target route is absent before making another change. Do not delete the default route table, Internet Gateway, default subnets, or default VPC.
For full teardown:
- Disconnect the test client.
- If you did not create an FQDN generation, remove the Site DNS forward and Site only after checking that no client depends on them, then move homed devices and revoke the gateway.
- If the optional FQDN resource produced generation history, the current release retains that immutable history and prevents deleting the resource, Site, or bound gateway context independently. Keep those control-plane objects until you retire the disposable organization/control plane as a unit; do not bypass referential checks with database edits.
- Delete the exact device-pool return route.
- Delete the private A record, then the private hosted zone after verifying it
contains no unrelated records. Remove the controlled public
CP_HOSTrecord at its authoritative DNS provider before releasing the control-plane EIP. - Terminate only the three tagged walkthrough instances and wait until they are terminated.
- Release their Elastic IPs, delete the three walkthrough security groups,
and delete the walkthrough key pair only after confirming it is not reused.
Then remove the matching local
KEY_FILE; retaining the AWS deletion while forgetting the local private key leaves unnecessary credential material.
List every target by tag and inspect it before any destructive command:
aws ec2 describe-instances \ --filters "Name=tag:Project,Values=${PROJECT_TAG}" \ --query 'Reservations[].Instances[].{name:Tags[?Key==`Name`]|[0].Value,id:InstanceId,state:State.Name,private:PrivateIpAddress,public:PublicIpAddress}' \ -o tableaws ec2 describe-addresses \ --filters "Name=tag:Project,Values=${PROJECT_TAG}" \ --query 'Addresses[].{allocation:AllocationId,association:AssociationId,instance:InstanceId}' \ -o tableNever use an unfiltered account-wide teardown command for a default VPC.